Importing points from Google Earth to Adobe Illustrator brings an added bonus: high-resolution vector icons make the journey, too.
In the life of a busy cartographer, Google Earth is a handy tool.
Google Earth is an effective environment to map points-of-interest or to finetune the positions of points you export from Adobe Illustrator via Avenza MAPublisher.
GOOGLE’S ICONS
But here’s a surprise: when importing a Google Earth .kml/.kmz file into Illustrator, Google’s playful icons enter your map file as editable icons.
Here’s what you can do to them.
BEGIN IN GOOGLE EARTH
Let’s start in Google Earth. Create a folder for the points-of-interest you’ll create in My Places. Next, create a point by clicking the yellow map tack symbol (Add Placemark) and tapping on the map. Or, find an existing location with a placemark, right-click it, then choose Save to My Places. Be sure to move these points into the My Places folder you created.
EXPORT AND IMPORT
When you finish creating your set of points, right-click on your folder and choose the Save Place As command to export a kml/.kmz file. Next, in Adobe Illustrator, use the Avenza MAPublisher Import command to bring the Google Earth file into your map. Once you’ve dragged the imported data layer into your current MAP View and geographically registered the icons, you’re ready to edit icons.
EDITING GOOGLE’S ICONS
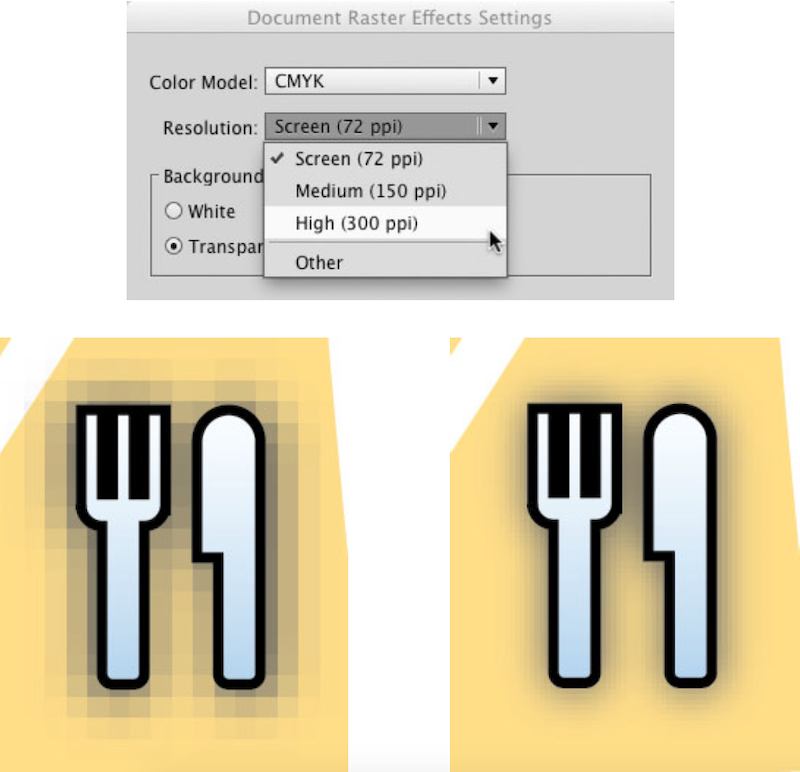
Notice the gray glow around the Google icons. Are they grossly pixelated? Chances are your Illustrator document’s raster effects setting is set to 72 dpi. You can adjust that. Open Effect > Document Raster Effects Settings and change the resolution to a higher number, like 300 dpi for print.
Next, double-click an icon to edit it if you want to make global changes to all instances of that icon across your map. If you don’t, choose Break Link to turn the icon into non-symbol artwork. (This is a good way to create an icon variation that you can use as a new global symbol.)
In the Appearance panel, you’ll find the icon’s artwork grouped. You can ungroup the artwork (Object > Ungroup) if you want to edit part of it or simply use the Group Selection Tool to select part of the artwork to edit. Either way, you can change fills and strokes, reshape lines and objects with the Pen and Pencil tools, and apply Effects to objects or to the icon’s artwork as a whole.
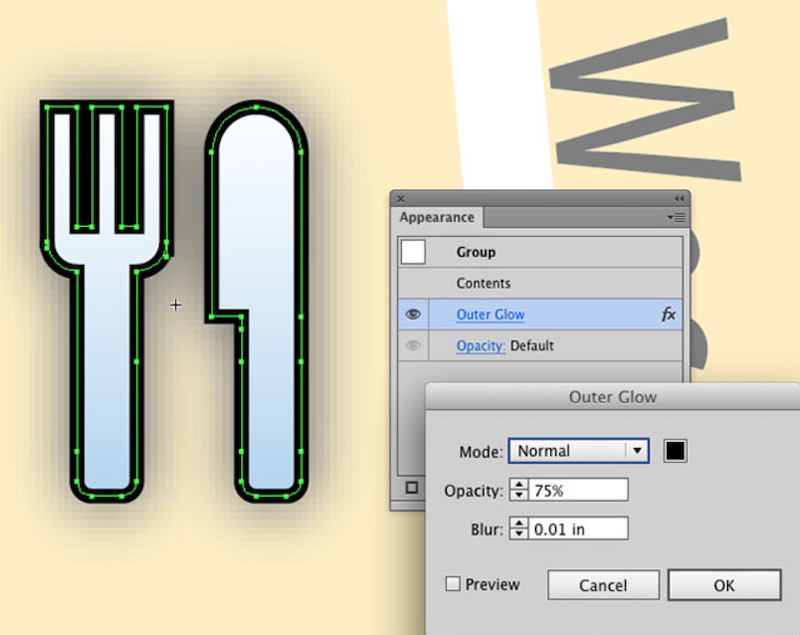
Experiment with the icon’s Outer Glow. For example, in the Appearance panel, delete the glow and add a Drop Shadow Effect (Add New Effect > Stylize > Drop Shadow). Apply the Distort and Transform effects to change the shape of the artwork. The Appearance panel presents seemingly endless ways of messing with (or messing up) Google’s familiar icons.
Customizing Googles icons is one way to customize the next Google map you create.